The BudStacks Guide · Part 7
The SEO Manager
One screen for being found — how each page reads in Google, how a shared link looks, and what the AI assistants are allowed to read and say about your store.
In your admin: /tenant-admin/seo
Products
What it’s for
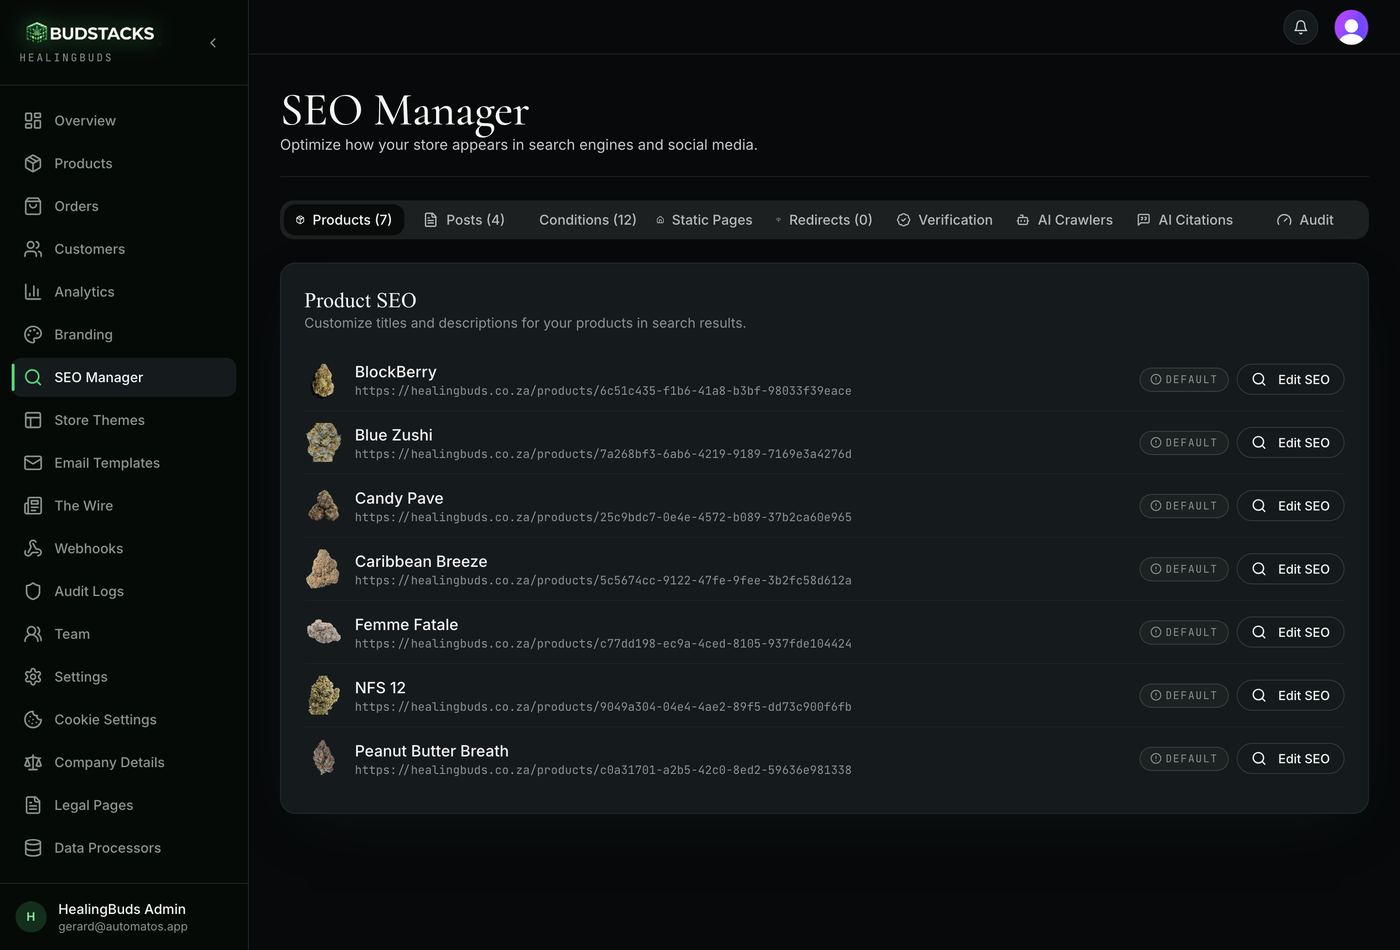
This is the list of everything you sell, each row showing the words Google would put in a search result for it. You are writing the shop window, one product at a time.
What it does
- Lists every product synced from Dr Green, with its picture and the real web address of its page underneath.
- A green Custom badge means you have written that product's listing. A grey Default badge means the store is filling it in from the product's own name and description — the same words every other shop selling that strain is using.
- Edit SEO on any row opens the editor (covered further down) with a live preview of the result.
- The list stays in step as you work — save a product and its badge flips to Custom straight away.
Try it: Polish a product's search listing
- Open SEO Manager in the left menu. You land on the Products tab.
- Pick a product you actually want to sell more of and press Edit SEO.Start with your three best sellers rather than working down the list — the effort pays back where the demand already is.
- In the title box, write what a customer would search for, not just the product's name — the strain, what it helps with, and your shop.Watch the counter beside the label. Google gives you roughly 60 characters before it cuts the sentence off mid-word.
- In the description, write one or two honest sentences about who this suits. Aim for the 70 to 160 character range.The preview at the top of the editor updates as you type — that grey text is what a customer reads before deciding whether to click.
- Press Save SEO Settings.You should see the badge on that row turn green and read Custom. Search engines pick the change up on their next visit, which is days rather than minutes.
Why you’ll use it
A default listing makes your product page look identical to every other store carrying the same strain. Twenty minutes spent on your top ten products is the difference between being one of a hundred identical results and being the one that reads like it was written for the person searching.
- · If the list is empty, your products have not synced from Dr Green yet — that happens in Products, not here.
- · A product that never synced has no page of its own, so its address line shows the products listing instead. The Audit tab reports those separately.
Posts
What it’s for
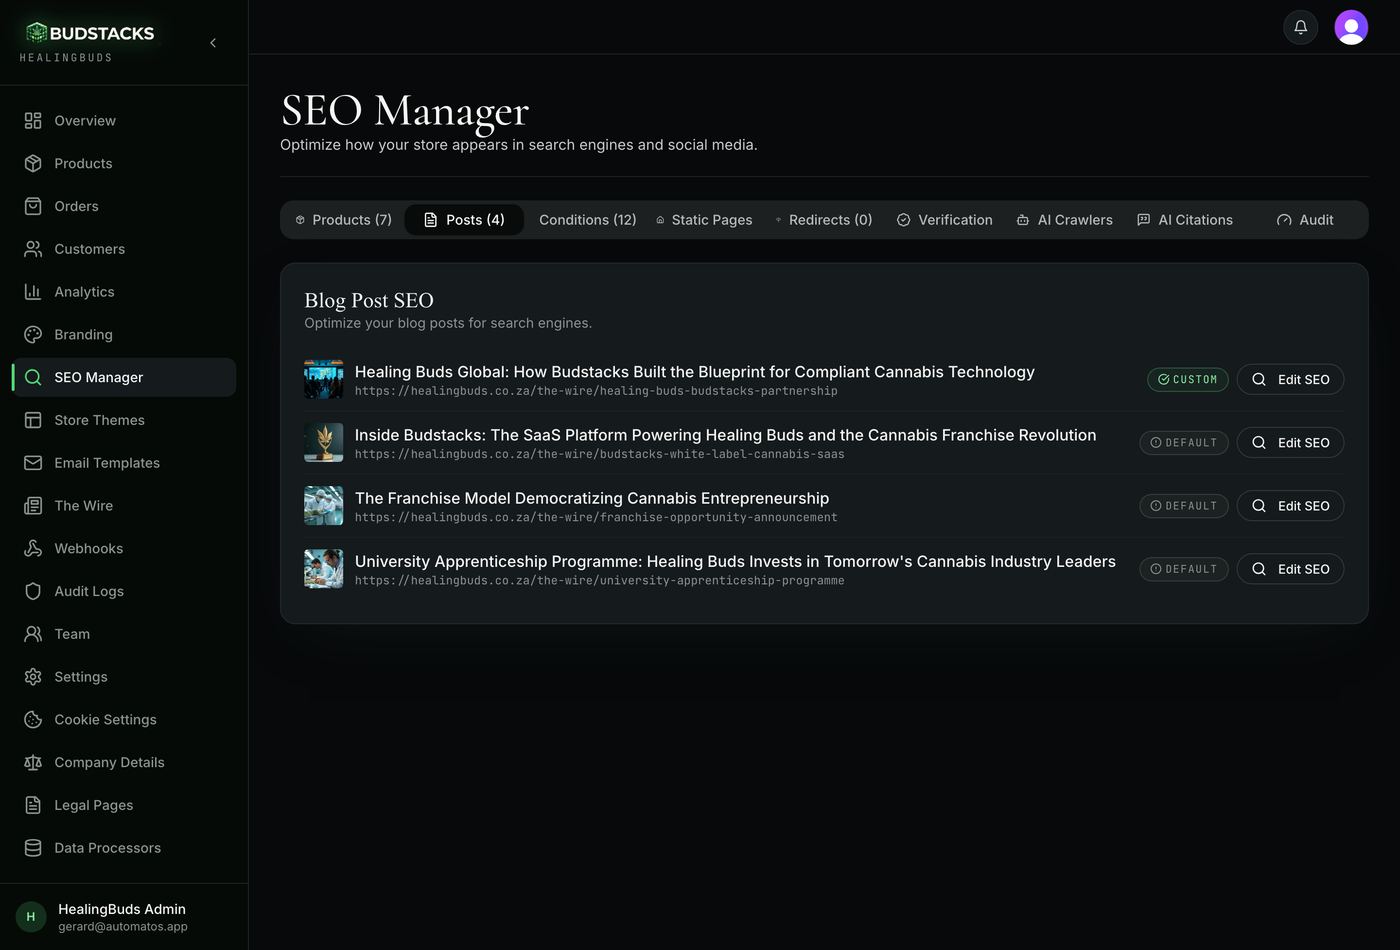
The same list, for the articles you publish in The Wire. A post's headline is written for a reader who is already on your site; its search listing is written for someone who has not found you yet.
What it does
- Lists every Wire post with its cover image and its address, which is built from the post's own name.
- Custom and Default badges work exactly as they do for products.
- The editor here also offers the description of the cover image — the line a screen reader announces and image search reads.
Why you’ll use it
Articles are how people who have never heard of you arrive. Someone searching a question about a condition or a strain is a long way from buying, and the article that answers them properly is what makes your shop the one they remember.
- · Nothing here creates or edits the article itself — that is The Wire. This tab only changes how it reads in a search result.
- · Renaming a post changes its address. On Pro, the old address is forwarded automatically — see Redirects.
Conditions
What it’s for
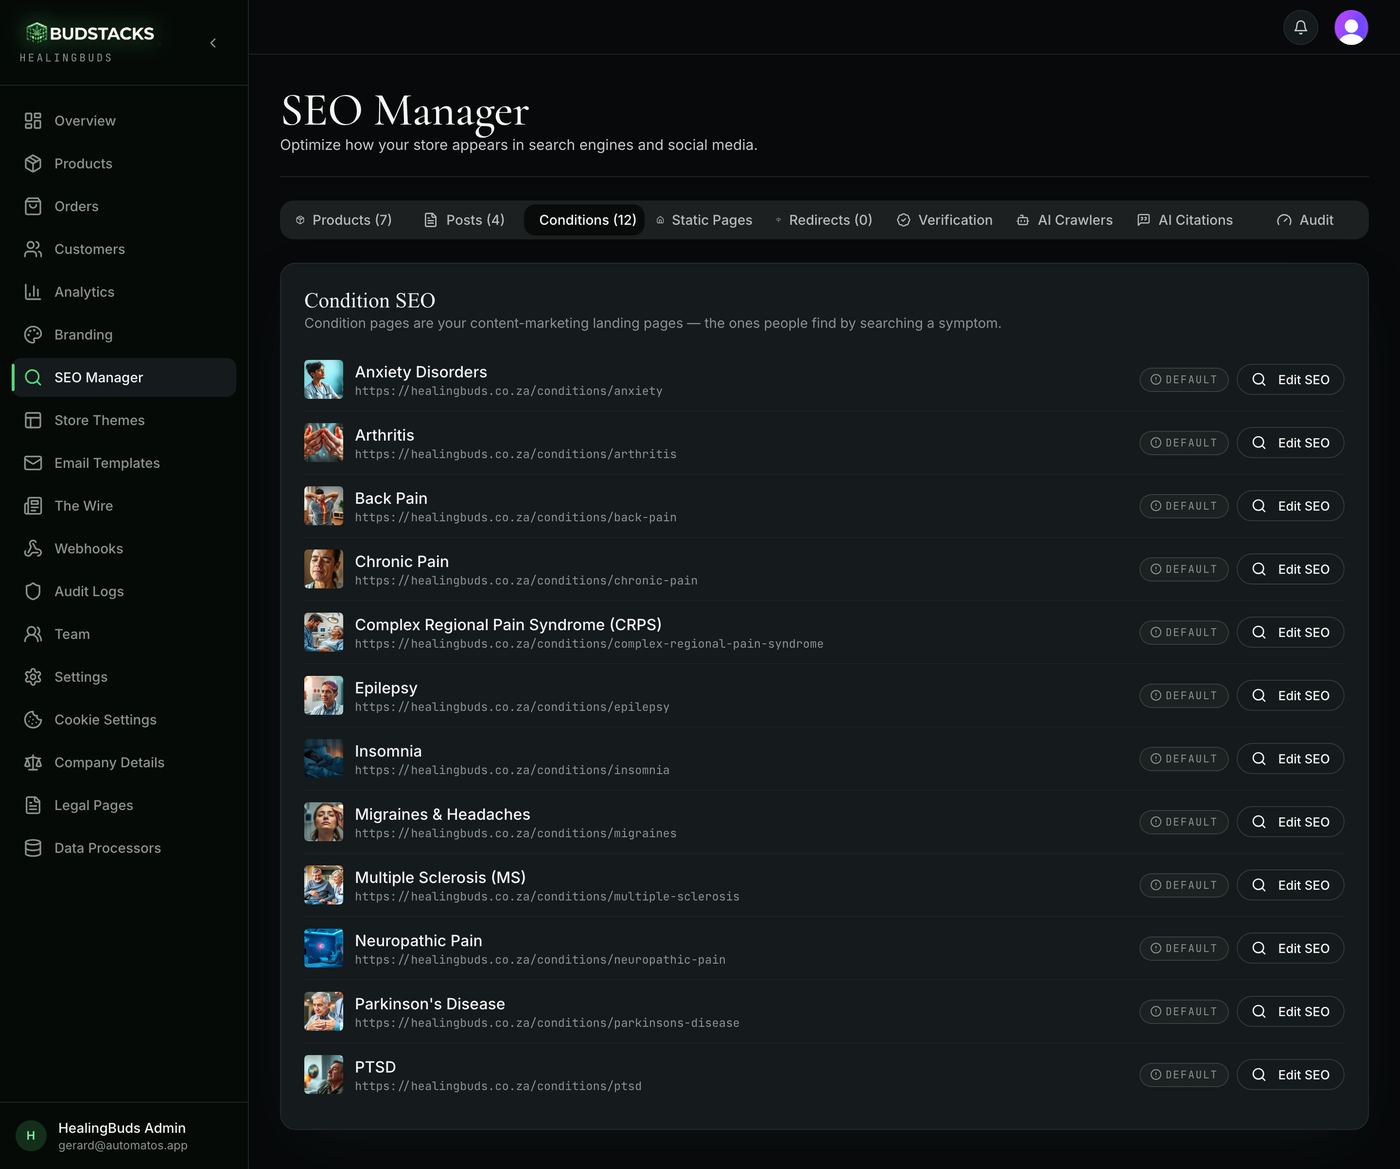
Condition pages are your quiet workhorses. Nobody searches for your shop by name at two in the morning; they search for what is keeping them awake, and these are the pages that answer them.
What it does
- Lists the condition guides that belong to your store, with the address each one lives at.
- Same editor, same Custom and Default badges as products and posts.
- Guides shared across the platform are managed centrally and are deliberately not listed here — they are not yours to edit.
Why you’ll use it
This is content marketing that does not read as marketing. A page that genuinely explains a condition earns visits from people at the very start of looking for help, which is far earlier — and far cheaper — than competing for the people already searching for a product by name.
- · If the list is empty, this store has no condition pages of its own yet.
- · The questions and answers shown on a condition page come from the platform's own library, so they cannot be rewritten in this panel. Product questions can — see the editor.
Static Pages
What it’s for
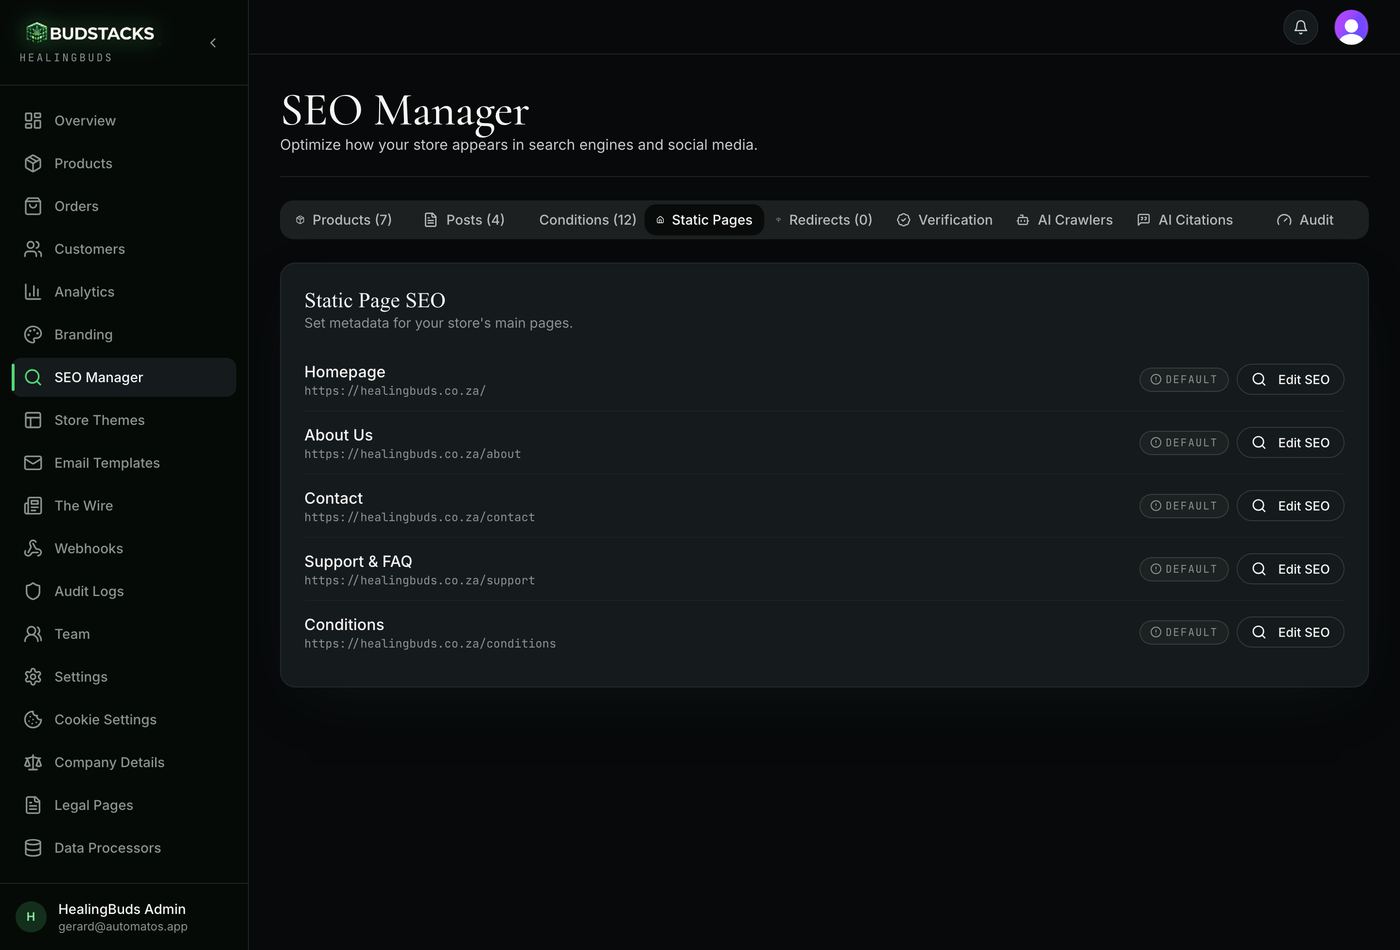
Your store's fixed pages — Homepage, About Us, Contact, Support and FAQ, and the Conditions listing. These do not come and go like products, and the homepage in particular is what people see when they search your business by name.
What it does
- Five rows, one per page, each with the address it lives at and a Custom or Default badge.
- Same editor as everywhere else, including the live search preview.
- The homepage row is the one worth doing first — it is the listing that appears when someone searches for your shop.
Try it: Write your homepage's search listing
- On the Static Pages tab, press Edit SEO on the Homepage row.
- For the title, use your shop name plus what you actually do and where — for example “Green Valley — Medical Cannabis Prescriptions, South Africa”.Your name alone wastes the space. Someone who already knows your name will find you either way; the rest of the line is what wins everybody else.
- For the description, write the sentence you would say to someone who asked what your shop is.
- Save, then do About Us and Support & FAQ while you are here.You should see all three rows show the green Custom badge. Five pages is under half an hour of work, once, forever.
Why you’ll use it
These pages are the ones people search for by name — yours, and your competitors'. They are also the shortest list in this whole panel. Finishing them is the fastest way to stop looking like a store that was set up and left.
- · If you wrote copy for an FAQ page in the past, it is still being shown on Support & FAQ — the old address now leads there. Saving the Support row replaces it with what you write today.
The SEO editor
What it’s for
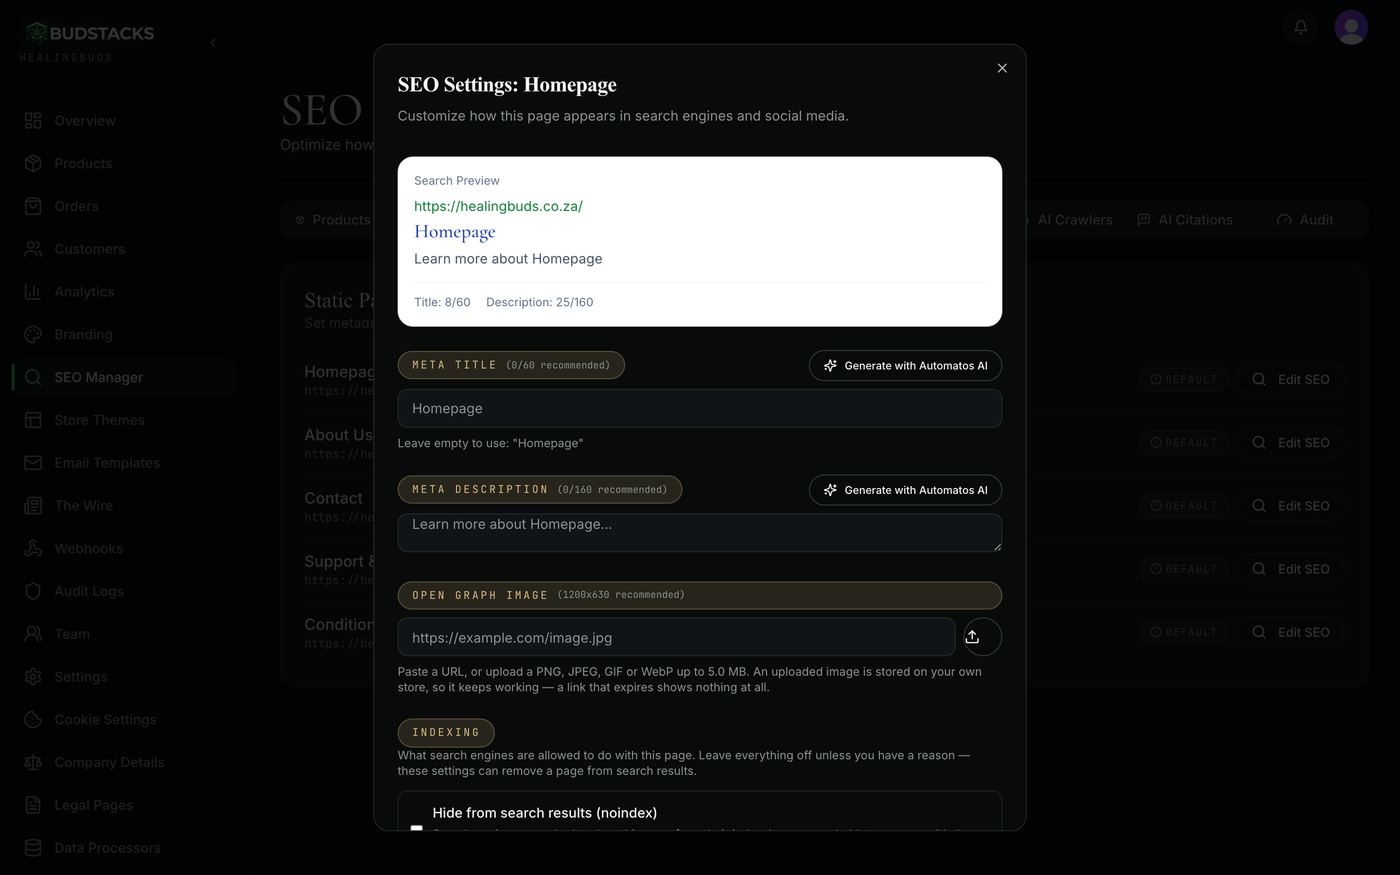
The one editor behind every Edit SEO button. Whatever you are editing — a product, an article, a condition guide or a fixed page — the top of this dialog shows a mock-up of the search result you are writing, updating as you type.
What it does
- The preview shows the address in green, your title in blue, your description underneath — the layout a search result actually uses.
- Counters beside each label: about 60 characters for the title, about 160 for the description. Go past and the box outlines amber — a nudge, not a block. Both are still saved in full.
- Leave a field empty and the store falls back to the item's own name and description. The hint under each box tells you exactly what that fallback would be.
- Image description (products and articles): what a screen reader announces and what image search reads. Roughly 125 characters.
- Share image: the picture that appears when someone posts your link in WhatsApp, Slack or LinkedIn. Paste an address on any plan; Pro adds an upload button, previews the image and warns you if it is the wrong shape. 1200 by 630 is the size every app crops from.
- Pro: pages with no image of their own automatically get a branded card built from your logo, your brand colour, the page's title and your own domain — so a shared link is never a bare grey row.
- Pro: questions and answers, on products only. Up to ten pairs, published on the product page itself and in the special format search and AI answer engines read answers from.
- Pro: indexing controls — hide this page from search results, ask engines not to follow its links, leave it out of your sitemap, and set the page's official address when the content genuinely lives somewhere else.
- Pro, with Automatos AI connected: a Generate with Automatos AI button beside the title, the description and the image description, and a Draft Q&A button on products.
Try it: Let Automatos AI draft a description, then make it yours
- Open any product's editor. If your store has Automatos AI connected, a small Generate with Automatos AI button sits beside the Meta Description label.
- Press it and wait a moment.You should see the drafted sentence appear in the box and a message saying to review it before saving. Nothing has been saved — it is ordinary editable text, and your Save button is still the only thing that writes.
- Read it as a customer would. Fix anything that is not true of your shop, and cut anything that sounds like an advert.The draft is written from your own product's details, so it is usually accurate — but you are the one whose name is on the result.
- Check the preview at the top, then press Save SEO Settings.
Try it: Answer the questions buyers keep asking (Pro, products)
- In a product's editor, scroll to Questions & Answers and press Add question.
- Type a question in the customer's own words — “Is this strain better for evening use?” — and answer it in a sentence or two you can stand behind.Up to ten pairs per product. The arrows reorder them; the bin removes one.
- Save.You should see the questions on the product page itself, and they are published in the format search engines and AI assistants read answers from. That makes your answers readable to them — it is not a promise of being quoted.
Why you’ll use it
Everything in the SEO Manager comes back to this dialog. Getting comfortable with the two boxes at the top — a title someone would click and a description that tells the truth — is most of the value on offer here, and it needs no technical knowledge at all.
- · The indexing controls can remove a page from search results. Leave them off unless you have a specific reason; the official-address box in particular should stay empty for almost every page you own.
- · If you set an official address that is not a full https:// address, the Save button stays disabled and the box tells you why, rather than failing after the fact.
- · If your store drops from Pro to Basic, indexing rules and product questions written on Pro stay saved and go quiet. Saving from Basic will not delete them, and the editor says so.
- · If you are on Pro but no Automatos AI account is connected, you get a card pointing at Settings — not at an upgrade page. You already have the plan; you just need the account.
- · An uploaded image is stored on your own store, so it keeps working. A link pasted from somewhere else can expire, and an expired link shows nothing at all.
Redirects
Pro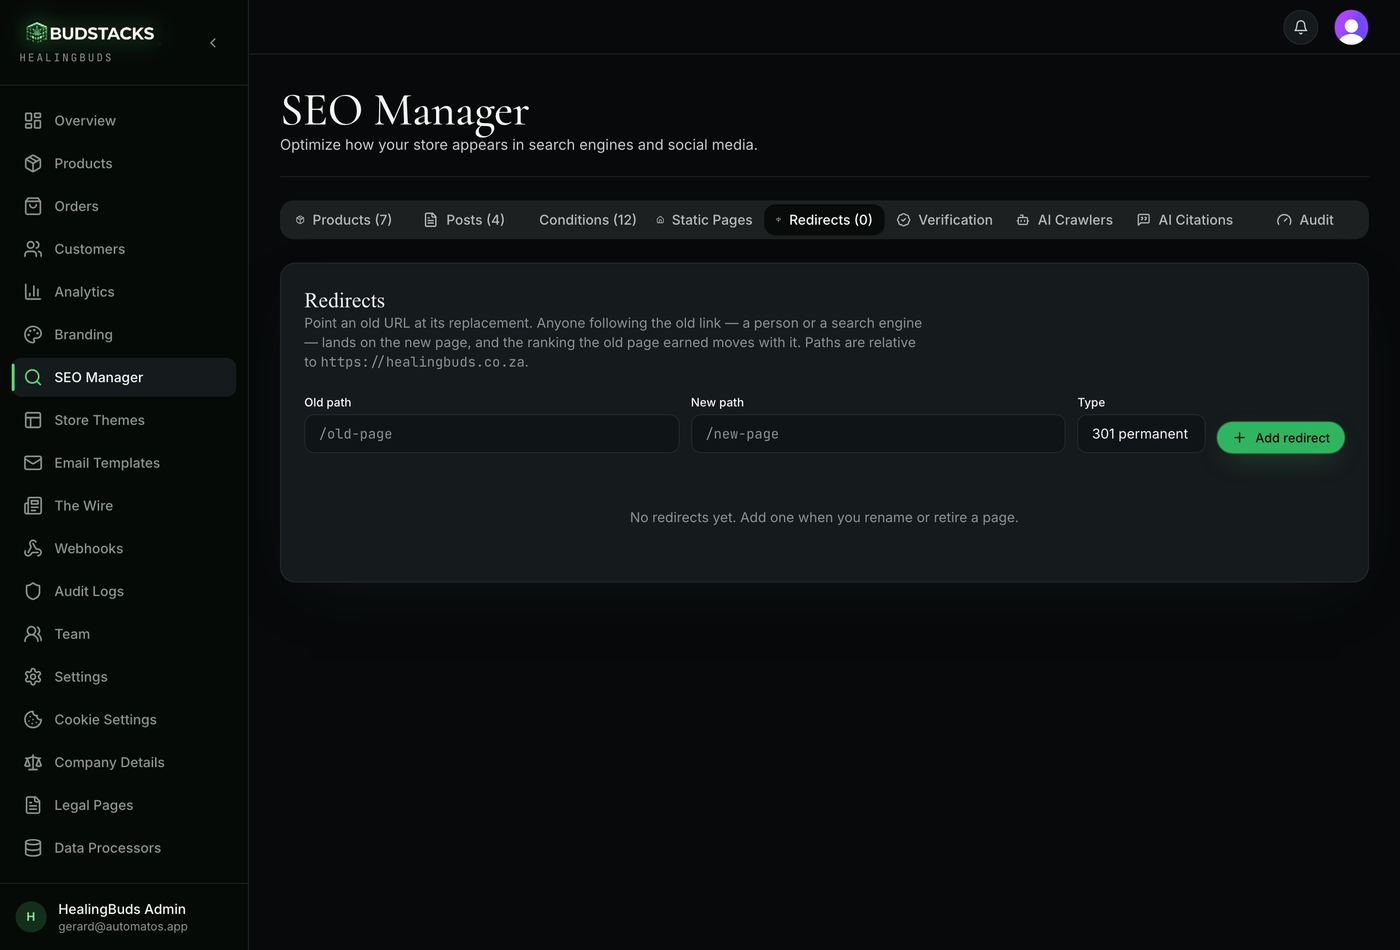
What it’s for
When a page moves or gets renamed, everyone who saved the old link — customers, other websites, Google — is left knocking on a door that no longer opens. A redirect quietly sends them to the new page instead.
What it does
- Add a rule with two boxes: the old path and the new one, both written relative to your store's address (/old-page, /new-page).
- Both redirect types offered are permanent, which is what tells search engines to move the credit the old page earned across to the new one. 301 is the default and the one to use unless you know you need the other.
- Rules can be re-pointed at a different destination or deleted at any time.
- Renaming a Wire post writes the redirect for you — no form to fill in. It also re-aims older rules at the new address and clears anything that would have blocked it, so a page renamed twice still resolves in one hop.
- Refuses anything that would break the store: a rule pointing at itself, a loop that leads back round, your store's own admin and system addresses, and destinations on other websites.
- Up to 500 rules per store, which is more than any storefront needs.
Try it: Create your first redirect
- On the Redirects tab, type the old path in the first box — everything after your domain, starting with a slash. For example /summer-sale.
- In the second box, type where it should go now — for example /products.
- Leave the type as 301 permanent and press Add redirect.
- You should see the new rule appear at the top of the list below the form.If it is refused, the reason appears in red under the form in plain words — the destination leads back here, that path belongs to the platform, and so on. Fix the path and try again.
- Open the old address in a new browser tab.You should land on the new page. Anything after a question mark in the old link is carried across for you.
Why you’ll use it
A page that 404s after a rename throws away every link and every bit of search ranking it had ever earned, silently. This is a five-second insurance policy against that, and the automatic redirect on a renamed article means you get it without remembering to.
- · Renaming an article on Basic still works — the old address just starts returning a not-found page, and nothing records where it went.
- · Rules match a whole address exactly. There is no wildcard, deliberately: one careless pattern could swallow every page beneath it.
- · If your store drops to Basic, your rules are kept and still listed here. They stop firing on the storefront until Pro comes back.
Verification
Pro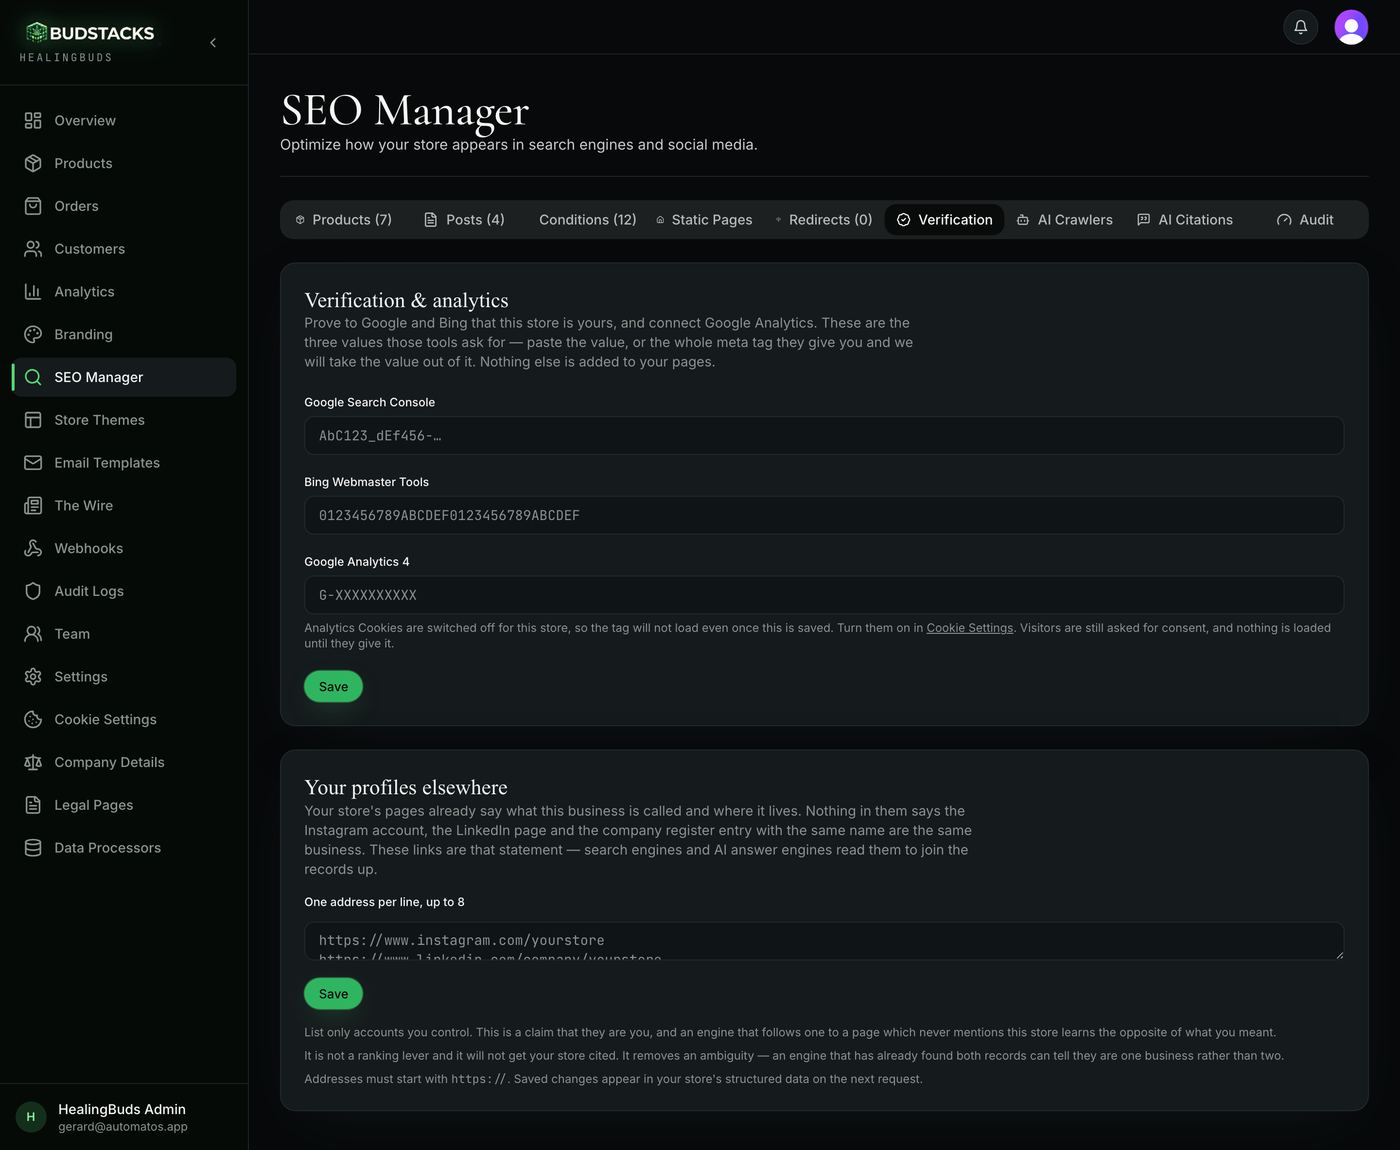
What it’s for
Google and Bing will not show you a site's data until you prove you own it. They hand you a short code to put on your pages; these three boxes are where it goes, and the third connects Google Analytics.
What it does
- Google Search Console and Bing Webmaster Tools each take a token. Paste the whole snippet those tools give you — the value is pulled out of it for you.
- Google Analytics takes a measurement ID, which looks like G-XXXXXXXXXX and lives in Analytics under Admin, then Data streams.
- A mistyped value is named before it is saved, with a line telling you where to find the right one.
- Nothing else is ever added to your pages. This is deliberately three specific boxes rather than a paste-any-code box, because a paste-any-code box is how a store ends up running someone else's script under its own domain.
- Also on this tab: Your profiles elsewhere — up to eight web addresses of accounts you actually control (Instagram, LinkedIn, a company register entry, a review profile), published as part of your store's structured details.
Try it: Prove the store is yours to Google
- In a separate tab, open Google Search Console and add your store's domain as a property.
- When it asks how you want to prove ownership, choose the HTML tag method and copy what it shows you.Copy the whole line if that is easier — this screen takes the code out of it.
- Paste it into the Google Search Console box here and press Save.
- Go back to Search Console and press its Verify button.You should see it confirm ownership. From then on Search Console shows you which searches bring people to your store — the one number no tool can guess for you.
Why you’ll use it
Search Console is the only place you can see what people actually typed before landing on your store. It is free, it belongs to you rather than to us, and this tab is the two-minute step that unlocks it.
- · The Analytics tag will not load until your store's Analytics Cookies switch is on, over in Cookie Settings. The field says so rather than leaving you watching an empty dashboard. Visitors are still asked for consent, and nothing loads until they give it.
- · Only list profiles you genuinely control. This is a claim that they are you — an engine that follows one to a page which never mentions your store learns the opposite of what you meant.
- · Linking your profiles is not a ranking lever and will not get you cited. It removes an ambiguity: an engine that has already found both records can tell they are one business rather than two.
AI Crawlers
Pro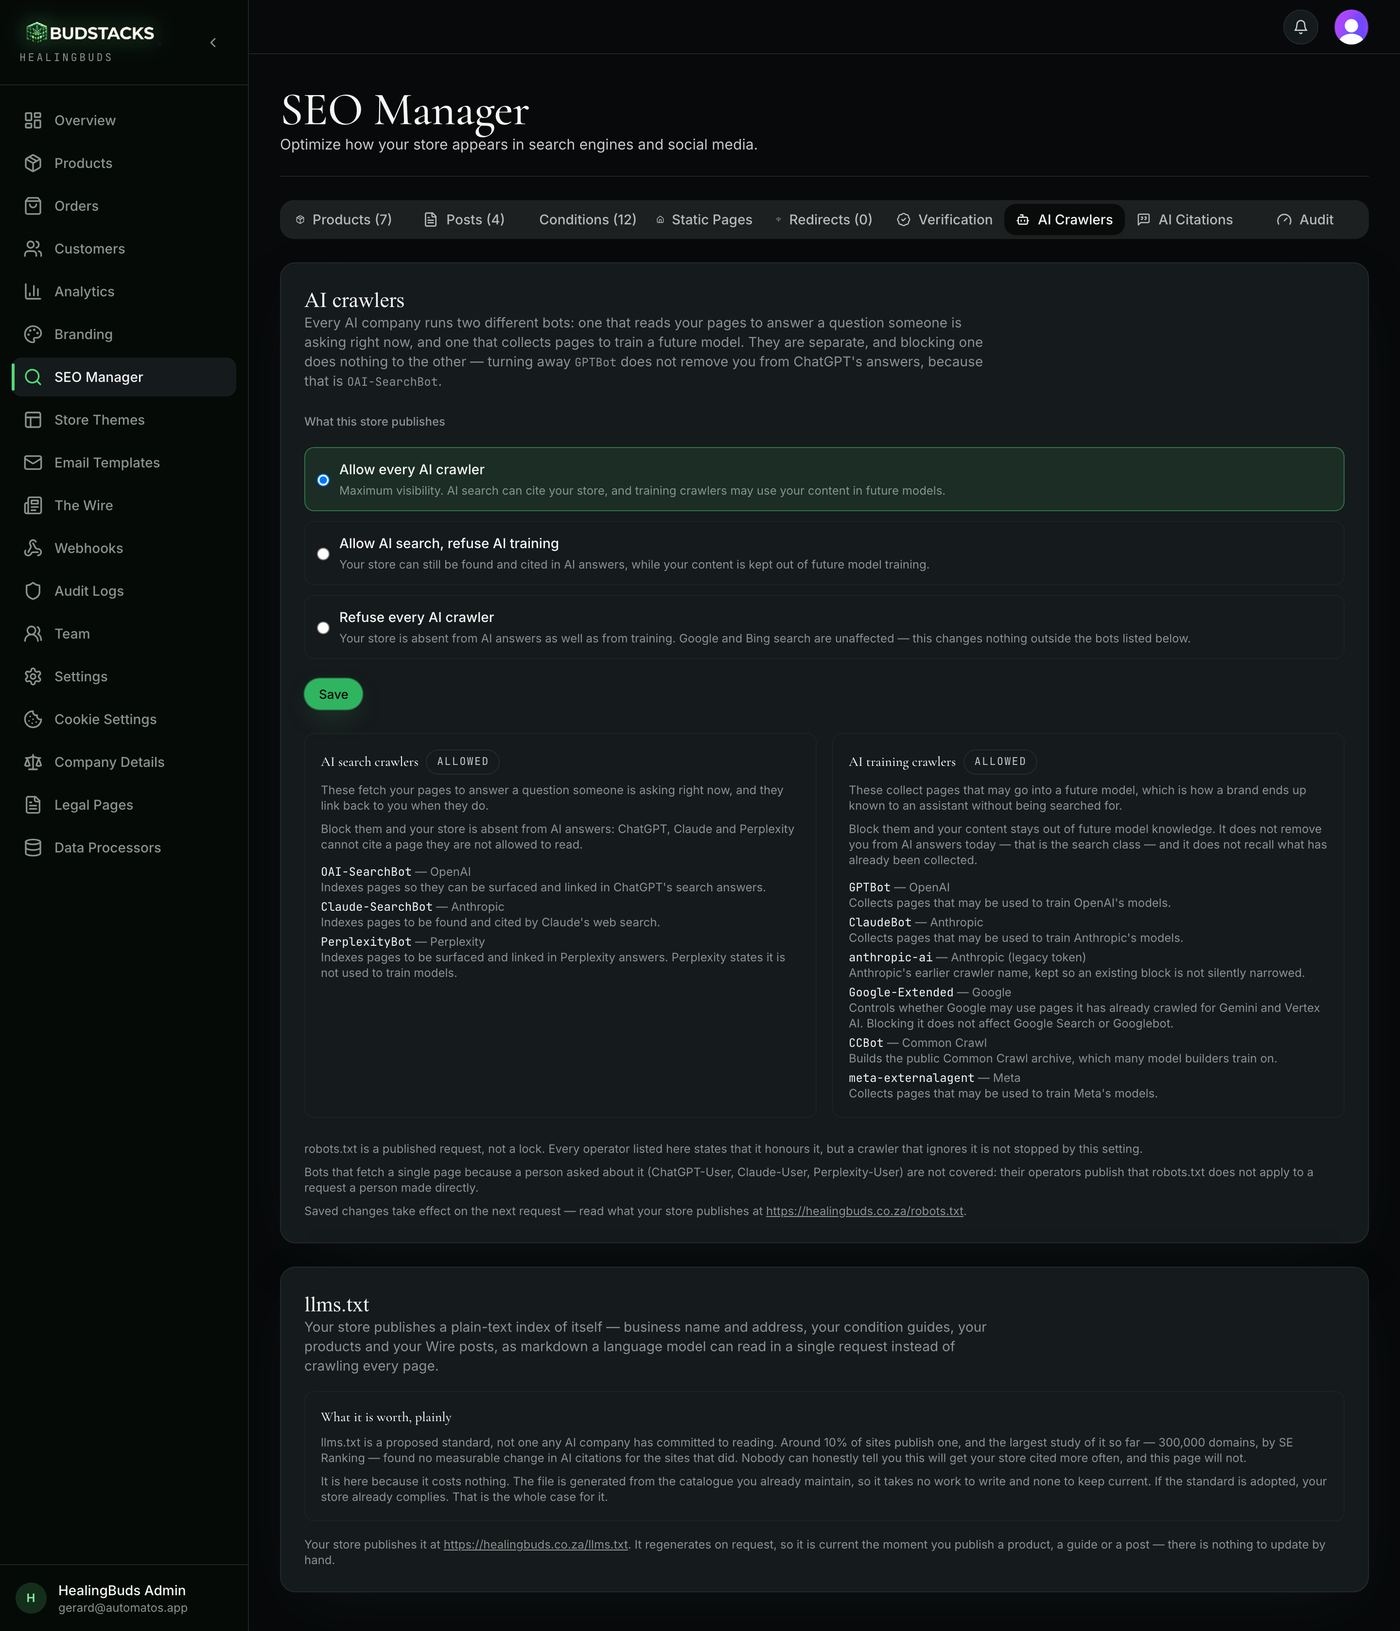
What it’s for
Which AI robots your store lets in. Every AI company runs two different ones, and telling them apart matters more than any other setting on this screen.
What it does
- Explains the split: one robot reads your pages to answer a question someone is asking right now, and links back to you when it does. A different robot collects pages to help train a future model. They are separate, and refusing one does nothing to the other.
- Three choices. Allow every AI crawler — the default, and maximum visibility. Allow AI search but refuse AI training — you can still be found and cited, while your writing stays out of future models. Refuse every AI crawler — you are absent from AI answers as well.
- Each class shows whether it is currently Allowed or Refused, which companies' robots belong to it, and one line on what each one does with the pages it takes.
- Google and Bing search are unaffected by every option here. This screen changes nothing outside the AI robots it lists.
- A link to the file your store publishes, so you can read exactly what was saved.
- The tab also carries the llms.txt card — a plain-text summary of your store that a language model can read in one request. It is generated from your catalogue, so there is nothing to keep up to date.
Try it: Decide what the AI robots may read
- Open the AI Crawlers tab and read the two cards below the choices — one for search robots, one for training robots.
- Choose. Most stores should stay on Allow every AI crawler; if you would rather your writing stayed out of future models, pick the middle option.The one to avoid by accident is Refuse every AI crawler. It removes your store from ChatGPT, Claude and Perplexity answers, because none of them can cite a page they are not allowed to read.
- Press Save. You should see a Saved tick appear beside the button, and the Allowed or Refused labels on the cards below move to match.
- Follow the robots.txt link at the bottom to read what your store now publishes.It is a plain text file. Seeing your own instruction written out there is the proof the setting took effect.
Why you’ll use it
A great many stores block “the AI bots” to protect their content and, without meaning to, delete themselves from the AI answers their customers are already reading. This screen exists so that choice is made deliberately, with the cost of each option written next to it.
- · This file is a published request, not a lock. Every company listed here states that it honours it — a crawler that ignores it is not stopped by this setting, or by any setting on any platform.
- · Robots that fetch one page because a person pasted your link into a chat are not covered. Their operators publish that this file does not apply to a request a person made directly.
- · About llms.txt, honestly: it is a proposed standard no AI company has committed to reading. Around one site in ten publishes one, and the largest study so far — 300,000 domains — found no measurable change in AI citations for the sites that did. It ships because it costs nothing and needs no upkeep, so if the standard is adopted you already comply. Nobody can promise you more than that.
AI Citations
Pro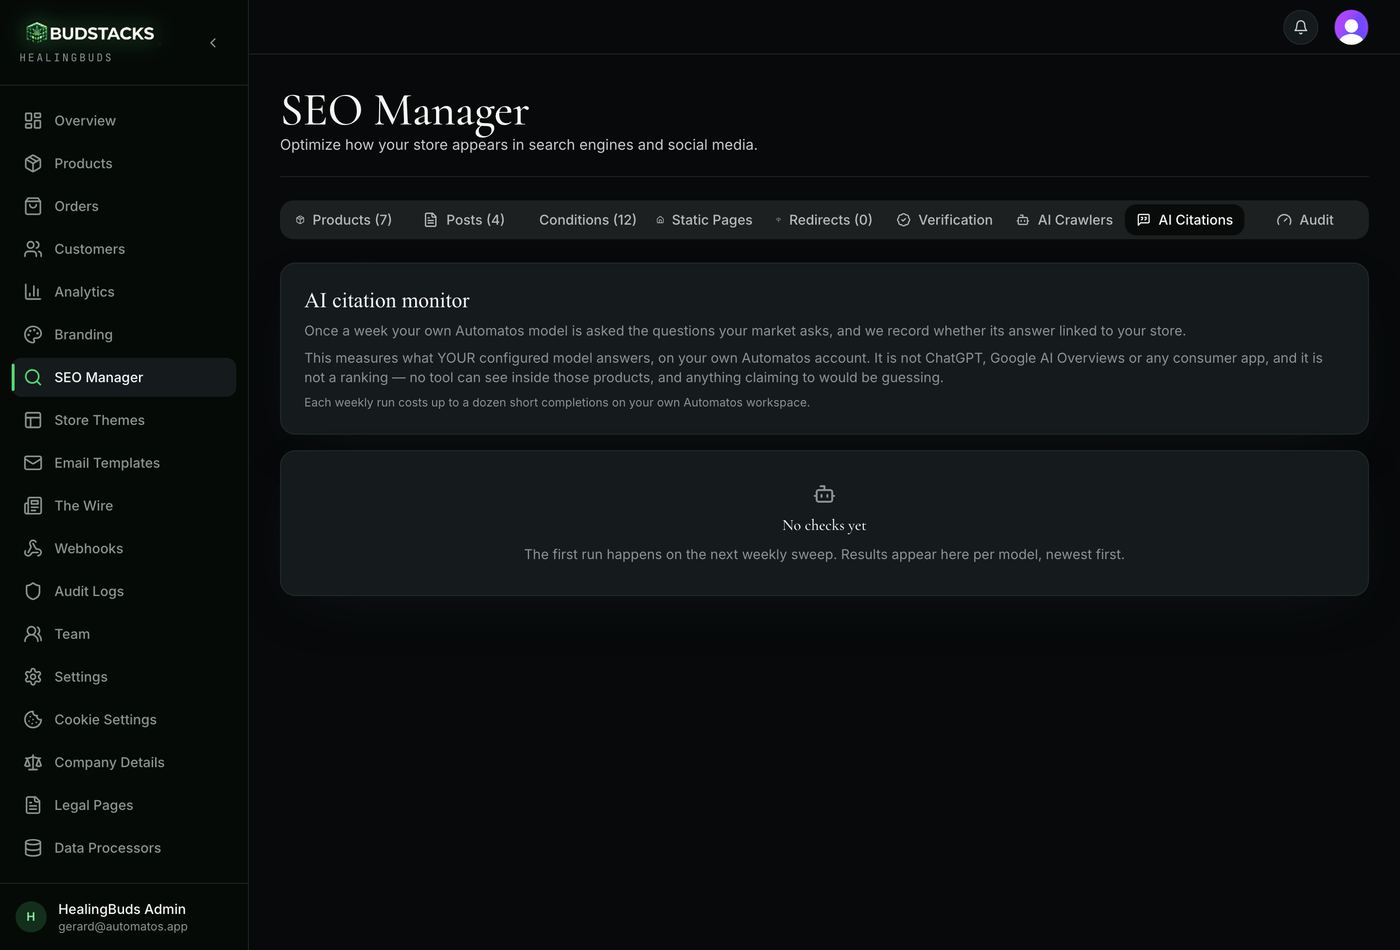
What it’s for
Once a week, your own connected Automatos AI model is asked the questions your market asks, and we record whether its answer linked to your store. It is the nearest thing there is to an honest answer to “do the AI assistants know we exist?”.
What it does
- Asks patient-shaped questions built from your own store: how someone legally accesses medical cannabis in your country, which providers treat the conditions you publish pages for, and what to know about the categories you sell.
- Records cited or not cited per question. Cited means the answer contained an actual link to your store — not a passing mention of your name, which would be far easier to count and worth nothing.
- Shows a tally per model: how many checks were recorded, how many were cited, and the weekly runs newest first.
- Keeps the most recent answer that linked you, with the question that produced it, so you can see the context rather than just a number.
- Not cited is shown as a count, not hidden. It is the baseline the tally is read against, and for most stores it is the common result at first.
Try it: See what AI assistants say about you
- Open the AI Citations tab. If your store has no Automatos AI account connected, you get a card pointing at Settings — connect one there and come back.
- On a newly connected store you will see “No checks yet”.That is expected. Nothing runs on demand — the first results arrive on the next weekly sweep, which happens early on a Monday.
- Once results exist, read the row of counts at the top of each model's card: cited, not cited, and how many checks have been recorded in total.
- Look at the weekly runs list underneath, newest first, and at the latest answer that linked you.One week tells you almost nothing. Four or five weeks after publishing condition guides and product answers is where a direction starts to show.
Why you’ll use it
More and more people ask an assistant before they ask a search engine, and until now there was no way to tell whether that conversation ever mentioned your store. This will not make you cited — but it tells you honestly whether the work you are doing here is moving anything.
- · Read the caveat printed on the tab, because it is the whole truth of this feature: it measures what your own configured model answers, on your own Automatos account. It is not ChatGPT, not Google's AI summaries and not any consumer app — none of those can be read from outside, and any tool claiming to is guessing.
- · It is not a ranking or a position. Nothing here is phrased as one.
- · Each weekly run costs up to about a dozen short requests on your own Automatos workspace — at most six questions across two models.
- · The models named on each card are the ones your own workspace reported. They are never our guess at who is behind them.
Audit
Pro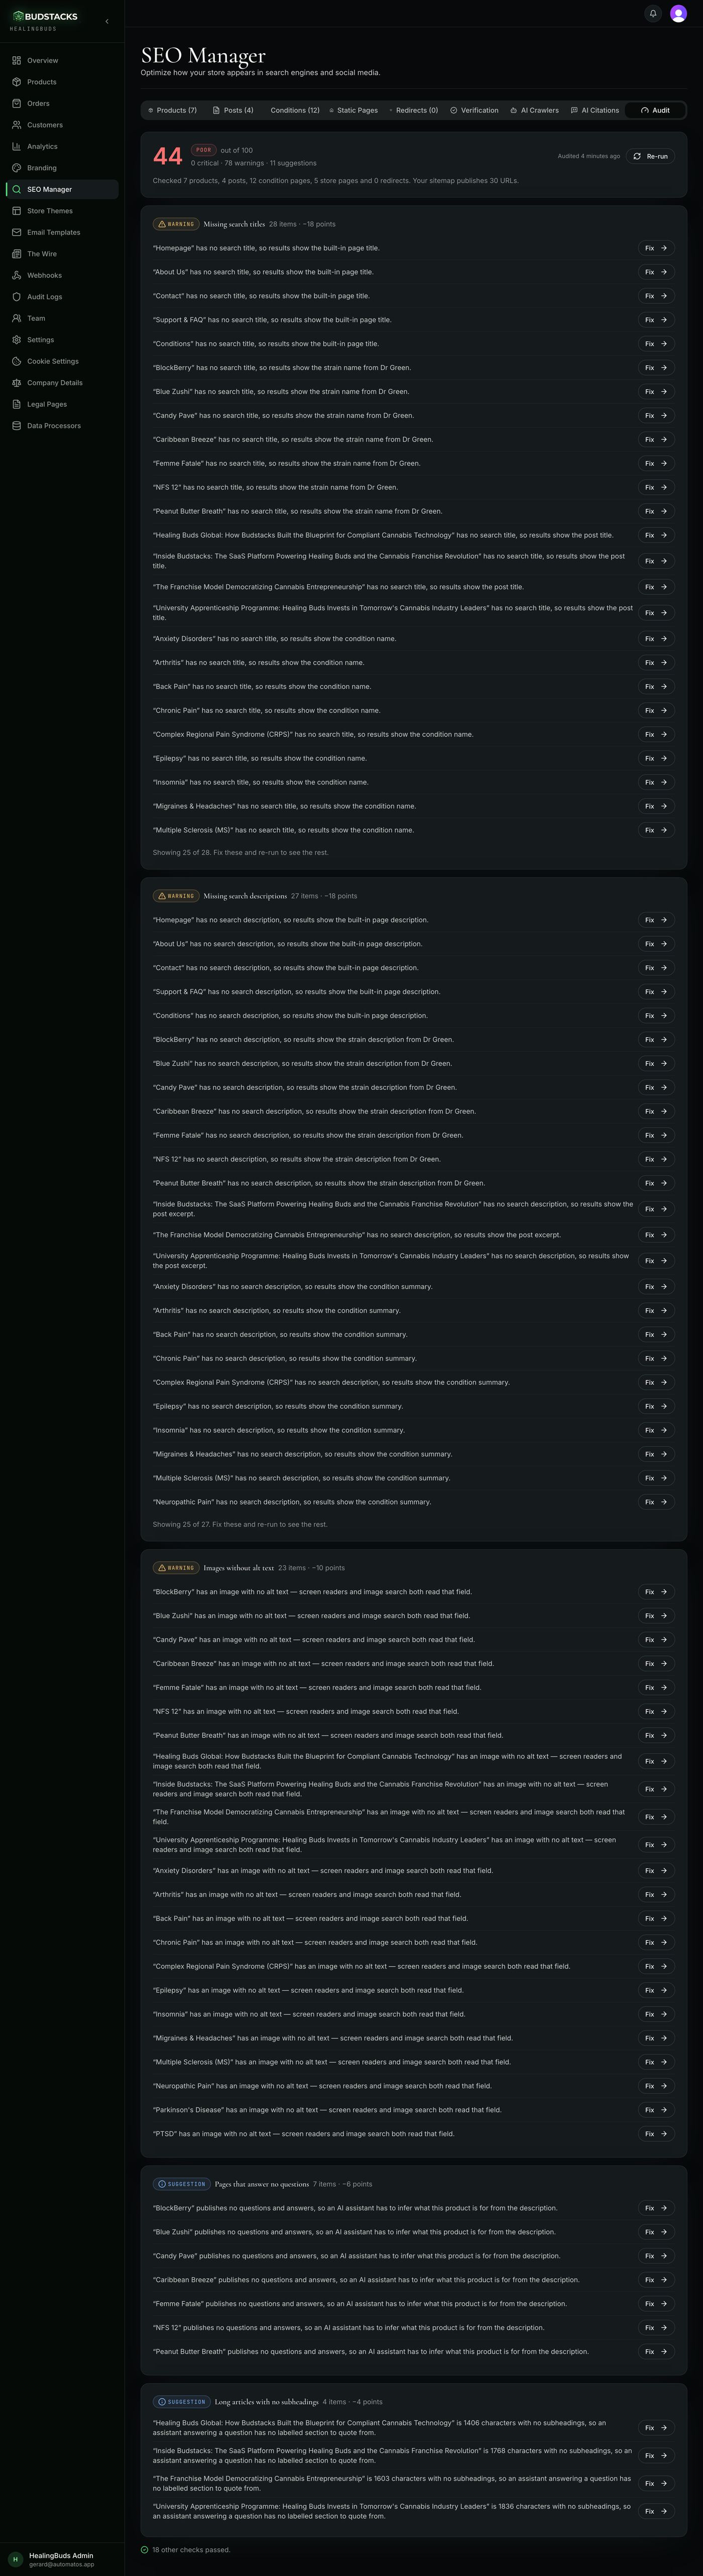
What it’s for
The tab that tells you what to do next. Open it and it checks the whole store by itself — every product, post, condition page, fixed page, your redirects and your sitemap — then scores it and lists what it found.
What it does
- Runs the moment you open the tab. No button to press first.
- Scores out of 100 with a plain band: Good, Needs work, or Poor, plus a count of critical items, warnings and suggestions.
- States what it looked at underneath — how many products, posts, condition pages, store pages and redirects, and how many addresses your sitemap publishes.
- Groups findings by kind, worst first, and shows what each group cost the score.
- Every finding names the item in a sentence — “this product has no search title, so results show its name instead” — and carries a Fix button that switches to the right tab and opens that item's editor for you.
- The one finding that lives elsewhere, unpublished Wire drafts, offers a link to The Wire instead of a button that would go nowhere.
- Weighted by what actually costs you traffic: a redirect loop is worth roughly three missing titles. Each kind of fault is capped, so four hundred products with no titles cannot hide a leaking sitemap behind them.
- Checks the AI side too: whether your own settings are turning away the AI search robots, whether your llms.txt has anything in it, unreviewed Wire drafts, products and condition guides with no questions and answers, and the heading structure inside your articles.
- Re-run recalculates from scratch whenever you want.
Try it: Read your first audit
- Open the Audit tab and wait a few seconds.You should see “Checking every page in your store…” and then a score. A store that has never been through this panel usually scores somewhere in the sixties — that is normal, not a rebuke.
- Ignore the number and read the first group. Critical items are at the top, because those are pages that are invisible, unreachable, or advertised wrongly.
- Press Fix on the first finding.You should land on the right tab with that item's editor already open. Make the change, save, and close the editor.
- Work down two or three more, then come back to the Audit tab and press Re-run.
- You should see the score move and those findings gone.The result is held for about fifteen minutes, so Re-run is what shows your work straight away rather than waiting.
Why you’ll use it
This is the difference between a score and a to-do list. Every line here names one real page and hands you the button that fixes it — so an hour spent in this tab is an hour of finished work, not an hour of reading advice.
- · Where one kind of fault has a long list, only the first twenty-five are shown and the group says so — fix those and re-run to see the rest.
- · A very large catalogue is checked on its first rows rather than all of them, and the panel says plainly that the score is a sample rather than the whole store.
- · Short titles and missing share images are marked as suggestions, not faults. A store that ignores every suggestion still ranks perfectly well.
- · The finding about a condition guide having no questions and answers is worth knowing but cannot be fixed here — those come from the platform's own library.