The BudStacks Guide · Part 13
The Team Room
Invite your people and control exactly what each of them can see and do.
In your admin: /tenant-admin/team
Members and invitations
What it’s for
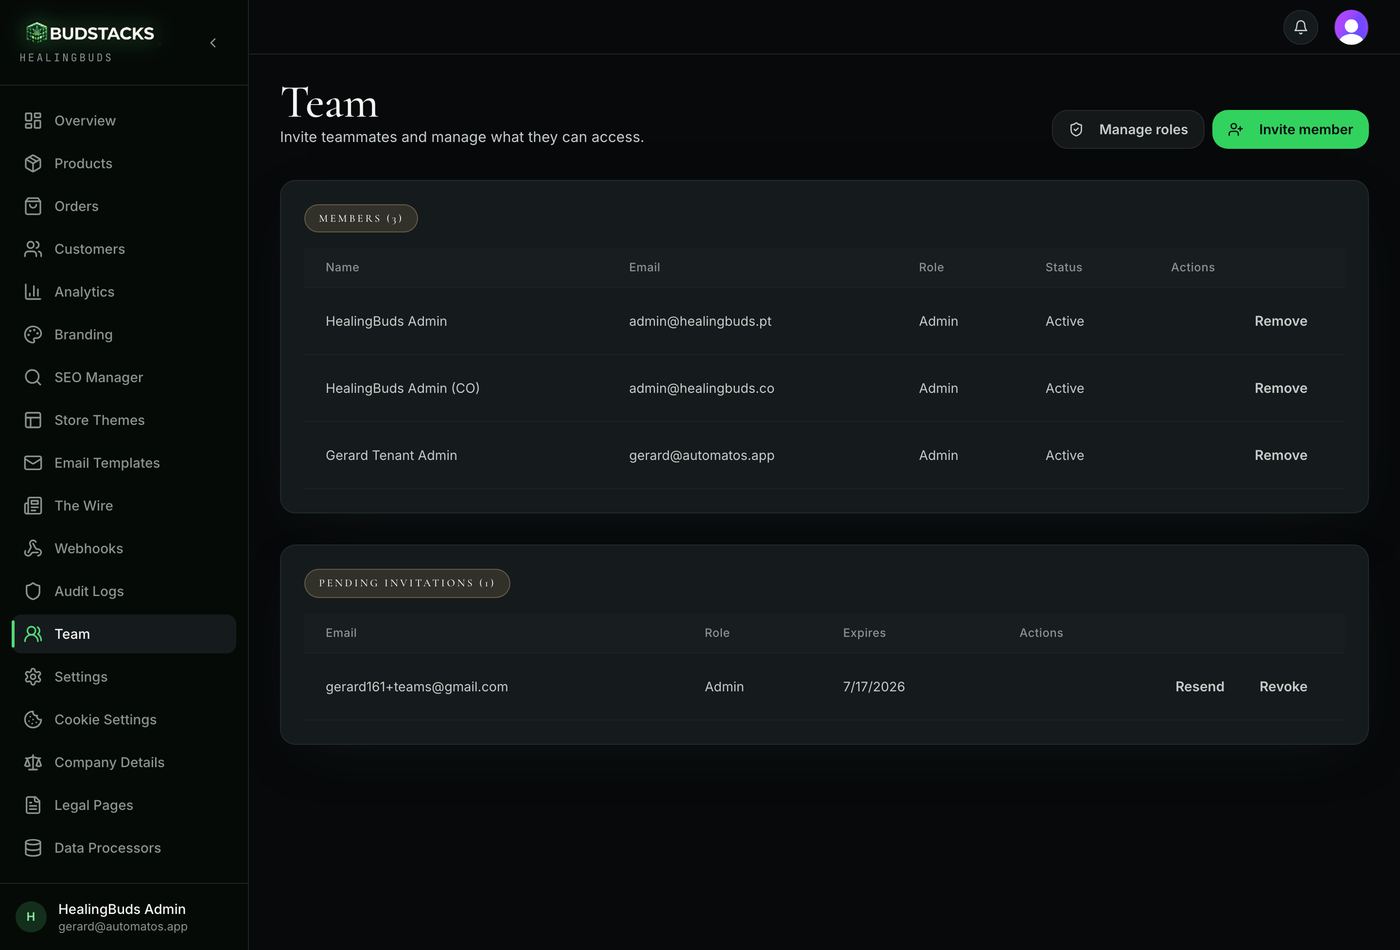
The list of people who can open this admin. You add someone by sending them an invitation to their own email address, so nobody ever has to share a password.
What it does
- The Members table shows each person's name, email, role and whether they are Active. Your own row is marked “(you)”.
- Invite member opens a small form with two things to fill in: their email address and the role they should have.
- The invitation goes out as an email carrying your store's own logo and colour, with a link that works for seven days.
- Anyone invited but not yet arrived sits in Pending invitations, with the role they were offered and the date their link runs out.
- Resend issues a brand-new link and restarts the seven days. Revoke kills the link there and then.
- Remove takes someone's access away immediately. It appears on other people's rows only, and only if your own role is allowed to remove members.
- Manage roles, at the top right, opens the permission matrix covered below. It only appears if your role can edit settings.
Try it: Invite your first teammate
- Open Team in the left menu and press Invite member.
- Type the email address they will sign in with.It has to be the address they actually use. The link only accepts the address it was sent to — forwarding it to a colleague will not let that colleague in.
- Choose their role. Editor is offered first; the five roles and what each one starts with are described in the next section.Do not agonise over this. A role is a label pointing at a set of switches, and you can change what any role means later without touching the person.
- Press Send invitation.You should see “Invitation sent to …” and a new row appear under Pending invitations with an expiry date a week out.
- Your teammate opens the link, creates their own BudStacks sign-in with that same email address, and presses Accept invitation.You should see them move out of Pending invitations and into Members as Active. If nothing arrives within a few minutes, ask them to check spam, then press Resend.
Why you’ll use it
The moment more than one person runs the shop, a shared login stops being convenient and starts being a liability — you cannot tell who did what, and you cannot take access away from one person without changing it for everybody. Ten minutes here gives each person their own way in, their own limits, and their own name against every action in the Paper Trail.
- · Only someone whose own role is Admin can invite another Admin. Anyone else gets a plain refusal instead.
- · You cannot remove yourself, and you cannot remove the last active member — the shop can never be left with nobody able to open it.
- · A removed person keeps their row, marked Inactive. Nothing they did disappears from the audit log; only their access goes.
- · There is no way to change an existing member's role from this screen. Remove them and invite them again with the new role — they keep the same sign-in and the same history.
- · Inviting an address that already has an invitation waiting replaces it. The older link stops working straight away, which is the safe way to correct a mistyped role.
- · One person, one store: an email already attached to a different BudStacks store cannot accept an invitation here. They need a separate address.
Roles & permissions
What it’s for
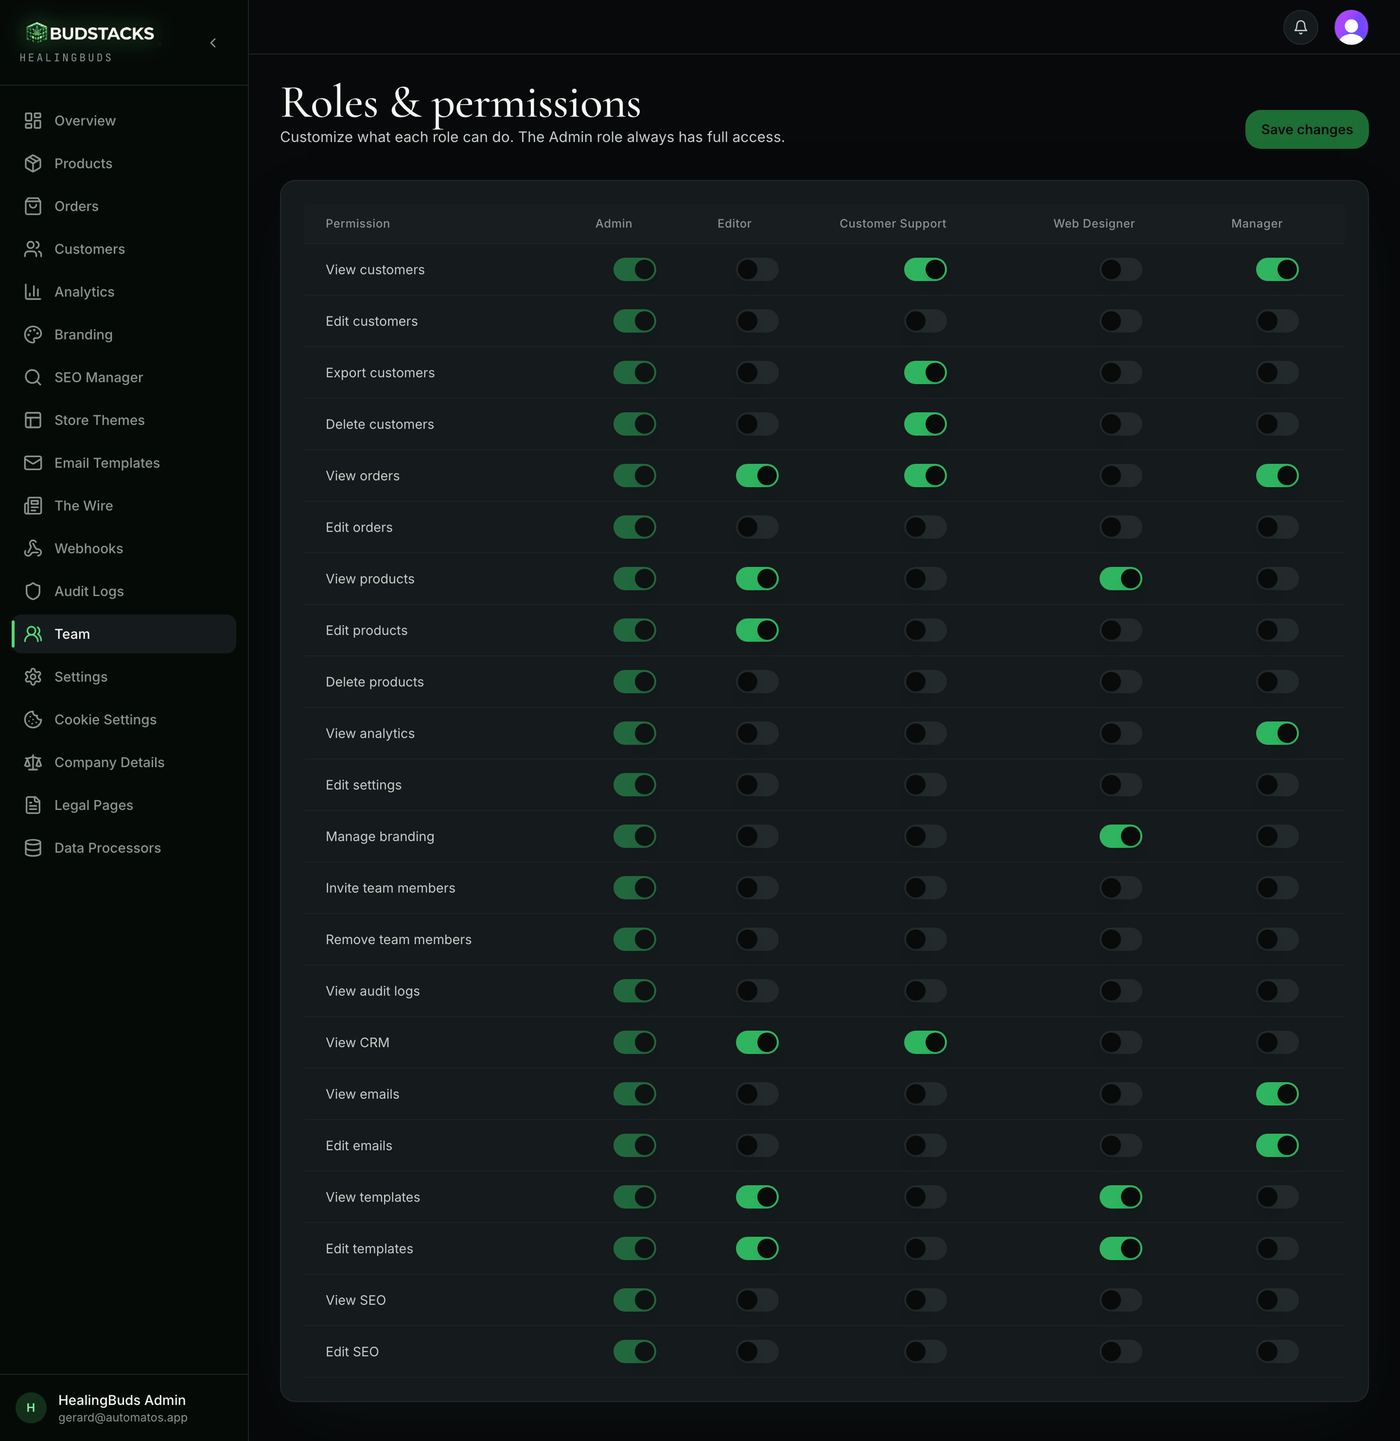
One grid that decides what each role can reach. Read down a column and you are reading exactly what a person with that role can see and do in your admin.
What it does
- Five roles, five columns: Admin, Editor, Customer Support, Web Designer and Manager. You cannot add a sixth or rename one.
- The Admin column is entirely on and every switch in it is fixed. Admin always means full access — that is what stops a store locking itself out.
- Twenty-two permissions down the side: customers (view, edit, export, delete), orders (view, edit), products (view, edit, delete), analytics, settings, branding, team (invite, remove), audit logs, CRM, emails (view, edit), templates (view, edit) and SEO (view, edit).
- Nothing saves as you flip switches. The Save changes button counts how many roles you have edited — Save changes (2) — and stays greyed out until something is actually different.
- Where each role starts, before you change anything. Editor: products and store themes, view and edit, plus orders and CRM to look at. Customer Support: customers, including export and the GDPR delete, plus orders and CRM to look at. Web Designer: store themes and branding, with products read-only. Manager: analytics, orders and customers to look at, plus full run of the Email Hub.
- The email and SEO permissions start off for every role except Admin. That is deliberate — those screens arrived after the four presets were drawn, and nobody should quietly gain a new power because a feature shipped. Switch them on here for the roles that need them.
Try it: Give a role exactly what it needs
- On the Team page, press Manage roles.Work out first what the person is actually for. “Writes the newsletter and checks how it did” is a job; “Manager” is only a label until you set it.
- Find that role's column and read down it. Every switch that is on is something they can reach.
- Turn on what the job needs and turn off what it does not. For a newsletter writer on the Manager role, that means View emails and Edit emails on.Turning a permission off does two things: the item disappears from their left menu, and typing the address in directly sends them back to Overview. There is no half-open door.
- Press Save changes.You should see “Role permissions saved”. It applies to everyone holding that role from their next page load — ask them to refresh rather than sign out and in.
Why you’ll use it
Most owners end up doing everything themselves because handing over one job means handing over everything. This screen breaks that. A designer can restyle your storefront without ever seeing a customer's details; someone answering emails can look up an order without being able to change your Dr Green connection. You set it once, and it holds for every person you ever put in that role.
- · A role is shared. Changing the Editor column changes it for every Editor — there are no per-person exceptions.
- · This grid belongs to your store alone. It has no effect on any other BudStacks store.
- · Two switches deserve a pause before you grant them. Edit settings hands over your Dr Green credentials, your domain and your sending address — and it also unlocks this very screen. Delete customers is the GDPR erasure, and it cannot be undone.
- · The Admin column cannot be edited, by design. If someone genuinely needs everything, give them Admin rather than trying to build a sixth role out of the others.
- · Each edited role is saved on its own, one after another. If one fails you get an error naming it, and the roles already saved stay saved — press Save changes again rather than starting over.